Saturday, January 31, 2009
AddressAnswerLimit Registry Key
Key Name: AddressAnswerLimit
Type: DWORD Default: NoKey (No limit)
Functionality: Limits number of A records put in answer to query.
Default: No limit on no response records.
Range: 5<= x<=28
Location: "HKEY_LOCAL_MACHINE\SYSTEM\CurrentControlSet\Services\DNS\Parameters"
By default, Type A record responses are not limited. Name resolver sends as many records as possible in it's UDP response packet. If the no of response records exceeds the space in the response packet, then truncation bit is set in the packet and sent to the client. In this case,
DNS servers often use TCP to retry queries when they receive a response with the truncation bit set.
However, If this registry is set, then the truncation bit is not set in a response packet, even if the packet space is exhausted. In this case, quering dns server retry query if the server receives packet with truction bit is set.
If the AddressAnswerLimit registry key is zero or not exist, Then Type A record responses are not limited and A responses records are written in DNS UDP packet. If all the records do not fit in a UDP DNS packet, then the truncation bit is set.
AddressAnswerLimit value is limited to range 5<= x <=28. If AddressAnswerLimit value x> 28, then it will limit to 28, and if it 0 < style="font-weight: bold;"> The following setting the reg key through reg add command.
reg add "HKEY_LOCAL_MACHINE\SYSTEM\CurrentControlSet\Services\DNS\Parameters" /v AddressAnswerLimit /t reg_dwrod /d
Note: 1. AddressAnswerLimit is restricted to only for type A record queries. It doesn't have any effect on other dns queries.
2. Changes to registry key through regedit.exe will be effective only after restarting dns server.
Posted by DNS Blogger(Student) 0 comments
Labels: DNS Server, Reg Key, Resource Record, windows 2003
Set roundrobin using dnscmd command
Posted by DNS Blogger(Student) 0 comments
Labels: command line, DNS CMD, DNS Server, Resource Record, windows 2003
RoundRobin Vs LocalNetPriority
1. If LocalNetPriority reg key is set to 1 and Round-Robin key does not exist or is set to 1, then DNS server roundrobins(rotates) among Type A records it returns in LocalNetPriority order(order of IP addresses having similar subnet mask address of the querying client) .
2. If RoundRobin reg key is 0 and LocalNetPriority is 1, then the DNS server returns the records in local net priority order. Here the dns server does not rotate among returned addresses.
3. If the value of RoundRobin is 1 and the value of LocalNet Priority is 0, the DNS server roundrobins(rotates) among available Type A records which are not in local net priority order.
4. If the values of RoundRobin and LocalNetPriority are 0, then the DNS server returns the records in the order in which they were added to the database. i.e for the same query always returns the first Type A record among available records in the database.
Posted by DNS Blogger(Student) 0 comments
Labels: DNS Query, DNS Server, Resource Record, windows 2003
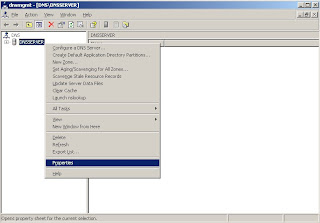
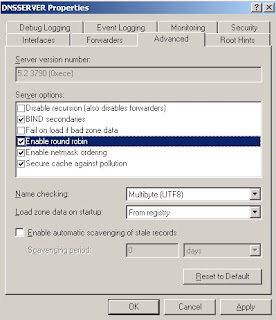
RoundRobin Registry key
Type: REG DWORD (Boolean)
Default: NoKey (Round robin A records)
Functionality: Determines order Type A records for same name to be sent
Posted by DNS Blogger(Student) 0 comments
Labels: DNS Server, Reg Key, Resource Record, windows 2000, windows 2003
RecursionTimeout Registry Key
Key Name: RecursionTimeout
Type: DWORD
Default: NoKey (Timeout is 15 seconds)
Functionaliry: timeout of DNS server to give up recursive query.
Location: "HKEY_LOCAL_MACHINE\SYSTEM\CurrentControlSet\Services\DNS
\Parameters"
By default, the RecursionTimeout is 15 seconds. But can be changed by editing the registry as shown below (assuem the time to be set is 200 seconds)
reg add "HKLM\SYSTEM\CurrentControlSet\Services\DNS\Parameters" /v RecursionTimeout /t reg_dword /d 200
Note: 1. changes to key done through reg add will be effective only after restarting the server
2. default 15 seconds is enough for most of the scenarios unless the dns server is on very low speed link.
3. if RecursionTimeout key is deleted, does not exist is zero, the DNS server timeouts after 15 seconds.
Posted by DNS Blogger(Student) 0 comments
Labels: DNS Query, DNS Server, Reg Key, windows 2000, windows 2003
RecursionRetry Registry Key
Key Name: RecursionRetry
Location: HKEY_LOCAL_MACHINE\SYSTEM\CurrentControlSet\Services\DNS\Parameters
Type: DWORD
Default: NoKey (3 seconds)
Range: 0x1–0xFFFFFFFF seconds
Functionality: sets interval between repeated query recursive lookups.
By Default, dns server retries after three seconds.
To change the reg value to 10 secs, do the following
reg add "HKLM\SYSTEM\CurrentControlSet\Services\DNS\Parameters" /v RecursionRetry /t reg_dword /d 10
Note:
1. Retries are made continously until RecursionTimeout period reaches.
2. Direct changes to reg key will not be effective until the server reboots.
3. To makes changes without having to restart the server then try with dnscmd.exe
Set SecureResponses using dnscmd command
Posted by DNS Blogger(Student) 0 comments
Labels: command line, DNS CMD, Resource Record, windows 2003
SecureResponses Registry Key
By default, the DNS server saves all the NS records of recursive name queries in the dns memory cache. However, if the reg key value is 1, then DNS server saves only those NS query response records for names that are in the same subtree as the server that provided them.
For example, the DNS server will save all name server (NS) records for subtree.mydns.com from the mydns.com server, but it will not save the Name Sever(NS) record for subtree.notmydns.com the mydns.com server.
The registry key is located at "HKLM\SYSTEM\CurrentControlSet\Services\DNS\Parameters".
Key Name: SecureResponses
Type:     DWORD (Boolean)
Default:  NoKey (No secureresponses)

Value:   0 (The DNS server saves all name query records in its memory cache)
         1 (The DNS server saves only those NS records that are in the same
     subtree of origination dns server)
To set value of this key, then run

reg add HKLM\SYSTEM\CurrentControlSet\Services\DNS\Parameters" /v SecureResponses /t reg_dword /d 1
Note, The changes through regedit.exe are will be effective only after restarting the DNS server.

To change secureresponses with out restarting dns server, do the following

1. Open DNS manager using dnsmgmt.msc command
2. In the dns manager console tree, right click on the dns server node and click properties.


3. In the dns server properties dialog, go to AdvancedTab and check "Secure cache against pollution" option, click apply and finally click OK button.
Posted by DNS Blogger(Student) 0 comments
Labels: DNS Manager, DNS Query, DNS Server, Reg Key, Resource Record, windows 2003, windows 2008
Friday, January 30, 2009
MaxCacheTtl Registry key
The registry key is located at "HKEY_LOCAL_MACHINE\SYSTEM\CurrentControlSet\Services\DNS\Parameters"
Key Name: MaxCacheTtl
Type : DWORD
Default : NoKey (Cache for up to one day)
Range : 0x0 | 0x1–0xFFFFFFFF seconds
To change the value the registry key to some cache time say 200 seconds, run the following
reg add "HKLM\SYSTEM\CurrentControlSet\Services\DNS\Parameters" /v MaxCacheTtl /t reg_dword /t 200
Note: 1. The changes to registry key through regedit will be effective only after restarting the DNS server.
2. This registry key doesnot have effect on WINS records saved in the DNS memory cache.
3. This registry key is supported by windows 2ooo, windows 2003 and windows 2008.
Posted by DNS Blogger(Student) 1 comments
Labels: DNS Query, Reg Key, windows 2000, windows 2003, windows 2008
ForwardDelegations Registry key
The registry key is located at "HKLM\SYSTEM\CurrentControlSet\Services\DNS\Parameters"
Key Name: ForwardDelegationsBy default, whenever a DNS server receives a dns query for a normal zone(not a delegated zone) name outside its authoritative zone, it simply forwards to a similar name server outside of its zone. However, when it receives a query for a delegated subzone, it sends the query directly to the delegated subzone and does not forward it.
Type: DWORD (Boolean)
Default: NoKey (doesnot forward delegations.)
But,if the registry key is set to 1, then the query for a delegated subzone (with in the authorative zone) should be sent to outside of authorative zone just as it does by default.
Forexample, A dns server has a delegation for blogspot.com to blogger.com, if the server receives a query for dns-info.blogspot.com then the server should send the query to delegated zone blogger.com. if the registry key is set to 1, then the server sends the query to blogspot.com.
To change the reg key value to 1, then run the following on command prompt
reg add "HKLM\SYSTEM\CurrentControlSet\Services\DNS\Parameters" /v ForwardDelegations /t REG_DWORD /d 1 /f
Note:
1. Changes to ForwardDelegations reg key will be effective only after restarting the server.
2. This reg key used only when forwarding is enabled. If forwarding not enabled then queries to delegated zones not forwarded.
3. Forwarding should be enabled if the delegation itself was at a remote site that is reachable only through the forwarder.
Posted by DNS Blogger(Student) 0 comments
Labels: DNS Query, DNS Server, Reg Key, windows 2000, windows 2003, windows 2008
Set ForwardingTimeout using dnscmd command
1. To set forwarding timeout to default value run
dnscmd.exe /config /ForwardingTimeout

The above sets the forwarding timeout to 0 Secs in windows 2003(however through UI is sets minimum of 1 seccs) and 3 in windows 2008.
To verify the forwardingtimeout, run
dnscmd /info /ForwardingTimeout
2. To set forwarding timeout to a specific value say 10 seconds, then run
dnscmd.exe /config /ForwardingTimeout 10
Posted by DNS Blogger(Student) 0 comments
Labels: command line, DNS CMD, Reg Key, windows 2000, windows 2003, windows 2008
ForwardingTimeout Registry key
Key Name: ForwardingTimeout
Type: DWORD
Default: NoKey (No Timeout)
Value : value in seconds.
Location: "HKLM\SYSTEM\CurrentControlSet\Services \DNS\parameters"
This registry key is useful when multiple forwarders exists. Forexample, A dns server forwards a query to a forwarder by looking into its forwarding list. if the first forwarder fails to respond with in the timeout period, then the query will be sent to next forwarder in the list.
Note: 1. The ForwardingTimeout key is read onlywhen forwarders are configured.
2 This registry key is supported in windows 2000, windows 2003 and
windows 2008.
3. The ForwardingTimeout key needed only when forwarding is enabled.
Warning: 1. Do not directly modify the key in registry instead use the Forwarders tab in dns server properties dialog to set the forwarding timeout. In the forwarders tab dialog, Zero is not a valid value . If you enter Zero (0), In windows 2000, DNS uses the default value 0x5 but in windows 2003 and windows 2008 it used the value one (1).
2. If this key doesn't exists or contains invalid (-ve) value when forwarders are
configured, the server may fail to start or fail to resolve remote names properly.
Relevant Post:
set forwardingtimeout using dnscmd
Thursday, January 29, 2009
LocalNetPriority Registry key
Name : LocalNetPriority
Type : REG_DWORD
Default : 0x000000FF
Location: "HKEY_LOCAL_MACHINE\SYSTEM\CurrentControlSet\Services \DNS\parameters"
Functionality: Return dns query responses in local priority net order.
To set Local Net Prioriry to use 16-most significant bits(0x0000FFFFF) to order responses, just reset 16 -most significant bits in 0xFFFFFF i.e 0x0000FFFF and add the resultant value to reg key
reg add "HKLM\SYSTEM\CurrentControlSet\Services\DNS\Parameters" /v LocalNetPriority /t REG_DWORD /d 0x0000FFFF
To set Local Net Priority to windows 2000 mode, then set the reg key to 0x00FFFFFF.
reg add "HKLM\SYSTEM\CurrentControlSet\Services\DNS\parameters" /v LocalNetPriority /t REG_DWORD /d 0x00FFFFFF
Disable Root Hints
1. First, remove root hints from roothints tab in dnsmanager properties dialog.
2. Set the dns server to use recursion
3. Now, Bydefault, Windows DNS Server tries to load roothints from dns cache file cache.dns located at %systemroot%\sysmtem32\dns. So remove all roothint entries in cache.dns file, If you are unable to find roothints, then delete cache.dns
Wednesday, January 28, 2009
Set LocalNetPriority using dnscmd command
dnscmd.exe /config /LocalNetPriority 0x000000ff.
One can verify the default mode set by quering the reg key LocalNetPriority.

dnscmd /info /LocalNetPriority
Note, In default mode, 24 most significant bits are used to find address proximity list.
To set it to windows 2000's priority mode, run
dnscmd /config /LocalNetPriority 0xffffffff.
In this mode, traditional class A type subnet mask is used to find address proximity list.
To enable LocalNetPriority to custom enhanced mode, for example, if one wants to use 8-most significant bits to for calculating "address proximity", then just set the 8 most significant bits to zero as shown below in red color.
dnscmd /config /LocalNetPriority 0x00ffffff
if one want to change it to 16-bit, then run as dnscmd /config /LocalNetPriority 0x0000ffff
Posted by DNS Blogger(Student) 0 comments
Labels: command line, windows 2000, windows 2003, windows 2008
Tuesday, January 27, 2009
Netmask Ordering of Type A Records in DNS Server Responses
1. Subnet Address Proximity to the client.
2. Load balancing.
Subnet Address Proximity to the client: An address was said be in the proximity of the client. if it's subnet mask address is same as that of the client. For example, if the client had a Class A IP address, then all the Host type A response records with host addresses having same Class A subnet mask address will be put first in the result list.
This is called “local net prioritization".
The following shows the order of Host A responses to be sent for a dns query to a dns client having a Subnet mask address "S".
Host A Responses with Matching Subnet Mask "S" | Host A response but with different subnet masks |
Load balancing: if the DNS server sends Host A records in the same proximity order every time a dns query repeats from a dns client,Then the hosts which are first in order list will receive more load than hosts which are in last position. To alleviate this problem, DNS server sends Host A type records in round robin fashion.
In windows 2003 and windows 2008, load balancing is improved further. The following illustrates the improved behavior.
Suppose, In an orgainisation, or In WAN environment, internet address space can be organized in to Class A, Class B or even in Class C addresses. Using the default behavior of Address Proximity, Class B and Class C Host A records may not in the Proximity Address list even though the Class B and C addresses are physically nearer to the client. To address this issue, All addresses with matching 24 most significant bits will put in "Proximity Address List".
The following load balancing modes are supported in windows 2003 and windows 2008.
Default mode: In this mode, 24 most significant bits used to find proximity list.
Backport mode: In this mode, Address Proximity list is calculated using traditional windows 2000 behavior.
Extended Mode: In this mode, variable no of most significant bits can be used to find proximity address list.
Note: In windows 2000, load balancing using round rabin is applied only to Type "A" dns responses. But In windows 2003 and 2008 round rabbin is applied to all types of dns responses.
Relevant Posts:
set localnetpriority using dnscmd
Local Net Prioriry Registry Key
round-robin vs localnetpriority
Monday, January 26, 2009
EnableGlobalQueryBlockList Registry key
Key Name: EnableGlobalQueryBlockList
Type: reg dword
Default: 1
Location: HKEY_LOCAL_MACHINE\SYSTEM\CurrentControlSet\Services\dns\parameters
Functionality: Specifies Global Query Block List
To disable Global Query Block List, run
reg add "HKLM\SYSTEM\CurrentControlSet\Services\dns\parameters" /v EnableGlobalQueryBlockList /t reg_dword /d 0
To enable queryblocklist, just set the registry key to 1
reg add "HKLM\SYSTEM\CurrentControlSet\Services\dns\parameters" /v EnableGlobalQueryBlockList /t reg_dword /d 0
Relevant Posts:
Enable Global Query Block List on command prompt
Join domain using script
The following vb script join a client machine in to a domain.
1. Assume client machine name is "dnsclient, domain is "myrootdns2003.com", domain user with admin preveleges is administrator@myrootdns2003.com,
domain user password is "Mydns123"

2. Then run the below script (joindomain.wsf) on command prompt as

joindomain.wsf dnsclient /NWname:"myrootdns2003.com" /user:"Administrator" /Password:"Mydns123" /NWType:"1"


'###################################################
'                 Join Domain - joindomain.wsf
'###################################################


Password = ""
UserName = ""
DomainWG = ""
NWType = "1"


Call SetLogLevel()
Call SetVars()


Function ExecuteWMICommand(WMIEchoStr)
 Set objWMIService = GetObject("winmgmts:\root\cimv2")
 Set SystemInstances = objWMIService.ExecQuery("Select * from Win32_ComputerSystem")
 For Each Instance in SystemInstances
    TraceLog  "Credentials: " & DomainWG & "|" &  Password & "|" & UserName & "|" & "|" &NWType
    ExecuteWMICommand = Instance.joinDomainOrWorkgroup(DomainWG,Password,UserName,NULL,NWType)


 Next
 WMIEchoStr =  DomainWG
End Function

Function ExecuteValidationCommand(ValidationEchoStr)
 If ( NWType = "1" ) then
  'Join to domain
  OutStr = ExecCommand( "net config workstation | Findstr Domain")
 Else
  'Join to Workgroup
  OutStr = ExecCommand( "net config workstation | Findstr Workstation.domain")
 End If

 ValidationEchoStr =  StringGetLastWord (OutStr)
 ExecuteValidationCommand = "0"
End Function

Function CompareResults(WMIReturn, WMIEchoStr, ValidationReturn, ValidationEchoStr, OperationResultStr )
 OperationResultStr = "Machine join failed"
 CompareResults = OperationFailure
 If StrComp(WMIReturn,ValidationReturn,1) = 0 Then
  if StrComp(ValidationEchoStr,WMIEchoStr,1) = 0 Then
   CompareResults = OperationSucess
   OperationResultStr = "Machine joined successfully"
  End If

 End If
End Function

Sub SetVars ()
 Set colNamedArguments = WScript.Arguments.Named
 UserName = colNamedArguments.Item("User")
 Password = colNamedArguments.Item("Password")
 DomainWG   = colNamedArguments.Item("NWName")
 NWType = colNamedArguments.Item("NWType")
 if ( StrComp ( NWType,"0",1 ) = 0 ) then
  NWType = 0
 Else
  NWType = "1"
 End if

End Sub
Enable DNS Server forwarding
Assume the dns server name is "dnsserver" and the forwarding dns server ip address is "198.168.1.200"
1. open dns manager using the command dnsmgmt.msc.
2. In the left pane, select the dns server "dnsserver", right click on it, and select properties

3. Go to forwarding tab in the dns server properties dialog, Enter IP Address of forwarding dns server , click add, press apply and finally click ok.
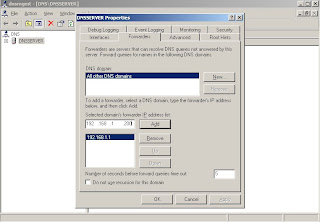
4. One can verify that the forwarder IP Address exist in registry.

DNS forwarders registry key
The registry key is located at "HKEY_LOCAL_MACHINE\SYSTEM\CurrentControlSet\Services\DNS"
Key Name: Forwarders
Type: BINARY
Default: NoKey (No forwarders)
Value: list of forwarders ip addresses.
Using DNS Forwarders is useful in following ways:
1. Save network traffic on slow links:
Suppose local DNS server uses low speed broadband/dial up connection to an ISP boundary server. And If local DNS server sends queries to remote servers, it may use up all the network bandwidth for sending recursive queries to remote servers. But if ISP's DNS server acts as a forwarder, then ISP server will do recursive queries to remote servers and returns the single final result to the local dns server.
2. Reduced remote traffic.
The forwarder dns server's dns cache, particularly in a environment where multiple local dns servers exists, is very much useful. When ever a local dns server sends a query, the forwarder looks in to its cache. If found, returns response immediately which saves remote traffic and round trip time.
Note: If the Forwarders key does not exist, then the local DNS server uses the normal iterative query process to answer recursive queries for remote names.
what is recursive dns query
Sunday, January 25, 2009
IsSlave Registry key
The registry key is located HKEY_LOCAL_MACHINE\SYSTEM\CurrentControlSet\Services\DNS\Parameters
Value: IsSlave
Type: DWORD (Boolean)
Default: Not a slave
value 0: Not a slave. If the forwarder do not respond, the DNS server issues standard iterative queries to try to resolve the remote names unless NoRecursion reg key is set to 0 and in the dns query RecursiveBit is set to 1 in which case, DNS falls back to recursive query resolution.
value 1: If the forwarder dns servers do not respond, then the DNS server terminates the search and sends a SERVER_FAILURE response to the dns client which has send the query.

Note:
1. IsSlave is used only when forwarding is enabled and atleast one valid forwarder IP address exists for Slave DNS Server.
2. To change the value of this reg key, Open DNS Console, Select dns server node, right click on server node, click properties, go to forwarders tab in properties dialog, select Do not use recursion. Doing so, reg key change will be effective without the need to restart the DNS server.
3. If the DNS Server uses BIND file, then the value of Slave field in the BIND file is taken over the value of isSlave in registry entry.
4. By default, The reg key does not exist.
DNS Enable Recursion
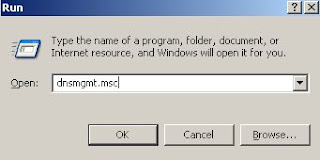
1. Open dns manager using command dnsmgmt.msc.
2. In the dns manager console tree, right click on dns server (assume server name is dnsserver"), then click properties.

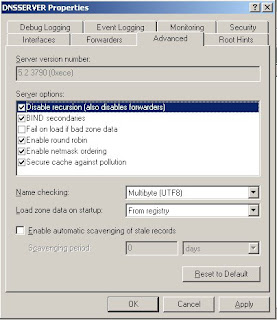
3. Go to advanced tab, uncheck disable recursion option, press apply and click ok. Thus enabled recusrion on dns server "dnsserver"
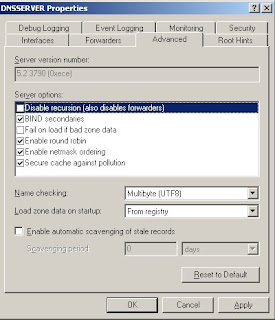
To disable recursion, go the same steps 1 to 3 but just check the "disable recursion" option.
NoRecursion registry key
The registry key is located at HKLM\SYSTEM\CurrentControlSet\Services\DNS\Parameters
Name: NoRecursion
Type: REG_DWORD
Values : 0, 1
Default value : 0
Value 0: The DNS server perform recursion only if the RecursionDesired bit set to 1 in the DNS query packet.
value 1: The DNS server won't perform recursive resolution irrespective of the value of RecursionDesired bit in the DNS query packet header.
Note:
1. This entry does not exist in the registry by default. One need to create it.
2. If DNS starts by using standard BIND file, then the BIND file RecursionDesired bit is used instead of value of this registry entry.
set rpcprotocol using dnscmd command
Assume server name is "dnsserver"
1. To set rpcprotocol to use tcpip for endpoint connections run
dnscmd dnsserver /config /RpcProtocol 1
2 To set it use namedpipe run
dnscmd dnsserver /config /RpcProtocol 2
3. To set it use LPC run
dnscmd dnsserver /config /RpcProtocol 3
4. To disable RPCprotocol run
dnscmd dnsserver /config /RpcProtocol 0
RpcProtocol Registry key
The allowable values for the registry key are
1 ---- Tcpip
2 ---- NamePipe
3 ---- LPC
The registry is located at "HKEY_LOCAL_MACHINE\SYSTEM\CurrentControlSet\Services\DNS\Parameters"
DNS server sets up RPC endpoints to allow connections over those protocols mentioned in rpcprotocol.
To set reg key value to 1 run the following command
reg add "HKEY_LOCAL_MACHINE\SYSTEM\CurrentControlSet\Services\DNS\Parameters" /v RpcProtocol /t reg_dword /d 1 /f
if the reg key value set to 0, then dns server can't use rpcprotocol service
Set EnableGlobalnamesSupport using dnscmd command
the following illustrates setting Enable Global Names support. Assume the dns server is "dnsserver"
dnscmd dnsserver /config /EnableGlobalNamesSupport 1
 |
dnscmd dnsserver /config /EnableGlobalNamesSupport 1
To disable GlobalNamesSupport run
dnscmd dnsserver /config /EnableGlobalNamesSupport 0
EnableGlobalNamesSupport Registry Key
Key Name: EnableGlobalNamesSupport
Type: RegDword
Default: 0
Location: "HKEY_LOCAL_MACHINE\SYSTEM\CurrentControlSet\Services\DNS\Parameters"
Functionality: Determines enabling global names support.
To set the key to 1 run the following command
reg add "HKLM\SYSTEM\CurrentControlSet\Services\DNS\Parameters" EnableGlobalNames Support 1
To disable GlobalNames Support , run
reg add "HKEY_LOCAL_MACHINE\SYSTEM\CurrentControlSet\Services\DNS\Parameters" EnableGlobalNamesSupport 0
Note: If queries for SRV records in GlobalNamesZone fails, then check this reg key is set to 1
Relevant Posts:
Set Enable Global Names Support through command prompt
Create DNS Global Names Zone using dnscmd command
1. Assume the dns server name is "dnsserver".
dnscmd dnsserver /ZoneAdd GlobalNames /DsPrimary
 |
 |
Saturday, January 24, 2009
Create DNS Global Names Zone
1. Open dns snap in manager by using command mgmt.msc on windows 2008.
 |
 |
 |
and also select "store zone in active directory" if one wants to create global names zone in the active directory.
 |
5. In the replication scope dialog, select "To all DNS servers in this domain" if one wants change it all dns server in the forest then, select "To Dns Servers in this forest".
 |
6. In the forward or reverse lookup zone dialog, select forward lookup zone and click next
 |
 |
 |
 |
 |
DNS Global Names
The following shows the working of the DNS Global Names for single global name resolution.
1. DNS Client sends DNS query for a NETBIOS Name by appending the Domain Suffix to the DNS Server.
2. If DNS Server hosts the Global Name Zone, then the DNS Server first look in
to the Global Name Zone for the name and if foound sends response to dns
client.
3. If name is not found in the Global Name Zone and WINS server exists, then
queries wins server for name resolution
4. if the above fails, dns looks for authoritative dns zone for the name is
checked.
Note: This feature is available only on windows 2008
Friday, January 23, 2009
Set Registration Refresh Interval through command prompt
reg add "HKLM\SOFTWARE\Policies\Microsoft\Windows NT\DNSClient" /v Registrat ionRefreshInterval /t reg_dword /d 1800 /f

To disable it just delete the registry key.
reg delete "HKLM\SOFTWARE\Policies\Microsoft\Windows NT\DNSClient" /v Registrat ionRefreshInterval /f

Relevant Posts:
Group Policy: Enable or Disable registration refresh
set dns zone refresh interval
Posted by DNS Blogger(Student) 0 comments
Labels: command line, DNS Client, Group Policy, windows 2003
Enable Connection Specific dns suffix group policy
1. Run the reg add command and set the "AdapterDomainName" registry key to 1
reg add "HKEY_LOCAL_MACHINE\SOFTWARE\Policies\Microsoft\Windows NT\DNSClient" / v AdapterDomainName /t reg_dword /d 1 /f

2. To disable connection specific dns suffix group policy, run
reg add "HKEY_LOCAL_MACHINE\SOFTWARE\Policies\Microsoft\Windows NT\DNSClient" / v AdapterDomainName /t reg_dword /d 0 /f
3. To set connection specific dns suffix group policy to "Notconfigured" then delete the registey key "AdapterDomainName".
reg delete "HKEY_LOCAL_MACHINE\SOFTWARE\Policies\Microsoft\Windows NT\DNSClient" / v AdapterDomainName
Posted by DNS Blogger(Student) 0 comments
Labels: command line, DNS Client, Group Policy, Reg Key, windows 2003
Connection Specifix DNS Suffix Group Policy
To Enable Connection Specifix DNS Suffix Group Policy, do the following.
1. open gpedit.msc on command prompt.
2. In the group policy wizard, browse to the node Computer Configuration - > Admininstrative Templates -> Network -> DNS Client, in the right panel, right click on "Connection Specific DNS Suffix" and select "properties" menu item
 |
 |
If this policy is not configured, it is not applied to any computers, and computers use their locally configured or DHCP configured connection specific dns suffixes.
Relevant Posts:
Enable Connection Specific Suffix On command prompt


